When working with designs that are larger than the available physical hoop, Hatch Embroidery will split them into parts, each containing an object or group of objects. When a multi-hooped design is output, each part is stitched separately after the fabric has been re-hooped. When outputting to machine file, multi-hoopings and split lines are applied. Hooping Sequence mode is activated, showing the separate hoopings.
Note: When aligning a multi-hooped design for stitchout, make sure you know where the true center of the overall design is. This should guide you in the placement of your first hooping. Bear in mind that the center of the design will not generally coincide with the center of the first hooping. This is not a problem if you are stitching onto a piece of fabric which is to be cut and sewn onto something else. But if you are stitching directly onto a ready-made item, it is critical. To help in your placement of the first hooping, print out a worksheet which includes a background image of the article. Voir également Add backgrounds.
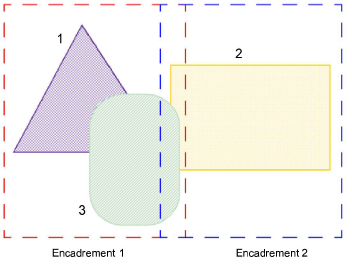
It is important to realize the numbers of hoopings in a multi-hooped design do not necessarily correspond to the number of output files. It all depends on the layering of objects within the design. In order to preserve the digitized stitching sequence, the same hooping may need to be visited more than once. Take the simple scenario illustrated here. Here we have one design with three objects and two hoopings. Object #1 gets stitched first. But then a change of hooping is required to stitch Object #2. To stitch Object #3, we need to return to our first hooping. That’s how we come to have more output files than we have hoopings.
Modules complémentaires
Commencez et apprenez plus vite avec...


