
Use Create Layouts > Basting Stitch Marker to insert a reference marker at any angle and position.
|
|
Use Create Layouts > Basting Stitch Marker to insert a reference marker at any angle and position. |
Use the Basting Stitch Marker tool to insert the basting stitch marker and place it before the embroidery design so it stitches first. If you want to manually create a multi-hoop design or continuous embroidery design, optionally insert basting stitch markers or bitmap markers at the end of the design. Click the Basting Stitch Marker tool in the Create Layouts toolbox to access the dialog. Various sizes and shapes are available.
1Insert the design. Group if not already grouped.
2Change to a new color not use used so your markers will be a different color.
3Click the Basting Stitch Marker tool in the Create Layouts toolbox.
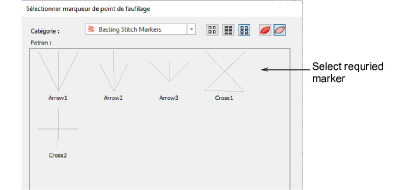
4Select the desired marker and click OK.
5Click in the design where you want to place the marker. Move the mouse to rotate it as necessary.
6Click a second time to anchor the marker.
7Continue to click to add more markers as needed. When finished, press the Enter key.
8At this time, the basting stitch markers will be in the last sewing position. Use the Sequence docker to move them to the first sewing position at the top.
9Group the basting stitch with the embroidery.
10Print the design layout template and use a physical position marker sticker at the same location and orientation as the basting stitch marker.
11Export the machine file. The basting stitch marker will stitch first.
12Move the start needle position to the center of the sticker on the work piece.
13Start stitching the basting stitch marker to confirm the location and orientation. Adjust as needed.
14Stitch out the design.
Note: If you turn on registration marks with multi-hooped designs, markers are automatically generated. Pour plus amples informations, voir Output multi-hooped designs.
Modules complémentaires
Commencez et apprenez plus vite avec...


