
Use Multi-Hooping > Multi-Hooping Options to change multi-hooping options in the Multi-Hooping tab of the Embroidery Settings dialog.
|
|
Use Multi-Hooping > Multi-Hooping Options to change multi-hooping options in the Multi-Hooping tab of the Embroidery Settings dialog. |
In order to help you correctly align multiple hoopings during stitchout, Hatch Embroidery can stitch out registration marks for each hooping. These do not form part of the design and are not saved with the design file. However, they are added during output and are viewable in the Hooping Sequence dialog.
Click the Multi-Hooping Options icon to access the Multi-Hooping tab.
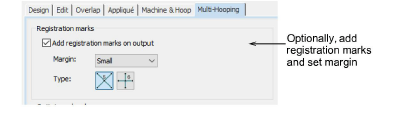
Choose Add registration marks and set a margin. The larger the margin, the greater the distance between the registration mark and the maximum embroidery area of the hoop. This makes it easier to align but there may be some trade-off in the precision of your registration.
Choose your preferred type of registration mark – 5-point or 6-point. 5-point marks will work for most machines and are easy to remove. 6-point marks are sturdier. They can also be used if the machine cannot stitch the 5-point mark.
To check that registration marks have been added, activate the hooping list in Print Preview.
Use the 5-point registration mark if possible as this will have fewer needle penetrations.
Run a test on your machine to see how it manages the registration marks. Check whether...
Threads are trimmed
Threads are pulled out before the next registration mark.
Note: Some machines will pull the thread harder than others and hence the 5-point may pull out when moving from one point to the next. In this case, try the 6-point.
Do all registration marks appear on the machine interface? If not, change to the 6-point mark. These will have additional needle penetrations because your machine adds tie-ins and tie-offs. This is not something you can prevent but you can try turning off trims on the machine.
It is important that your fabric does not stretch or warp when stitching. To achieve this, you must take extra hooping precautions.
If using knit, stabilize the back first so it does not stretch.
Use a sticky-back stabilizer or a good spray adhesive. Most recommend using a sticky-back tear-away stabilizer, heavy enough so that the registration marks do not tear the stabilizer.
Use pins through the registration marks of one hooping to align the corresponding marks of the next hooping.
Correct alignment of multi-hooped designs requires some practice. Training programs are available via Hatch Academy which demonstrate correct technique.
Add-ons
Get started & learn faster with...


