Use Context > Underlay to apply or exclude automatic underlays to new or selected objects. Right-click for settings.
|
|
Use Context > Underlay to apply or exclude automatic underlays to new or selected objects. Right-click for settings. |
The Underlay tool is a toggle button that allows you to apply automatic underlay to new or selected objects. Underlay is selected by default. Use the toggle to turn it off for selected objects, as needed. For instance, when applying an effect, such as Gradient Fill, you will probably want to turn off underlay altogether.
When turned on, default underlay settings adjust to suit the selected stitch type and object shape. Underlay stitching provides similar settings to cover stitch except that default stitch spacing is much wider.
Default underlay values are determined by selected auto fabric or template. While defaults are usually sufficient for most types of work, Hatch Embroidery lets you adjust values for different fabrics, lettering appearance and size. Larger areas and stretchy fabrics such as knits and pique generally need more underlay than smaller areas and firm fabrics such as drill or leather. At times, when you want a full design with extra lift under the stitches, a tatami or double-tatami underlay is preferable. On knits, edge run is best.
1Double-click a filled object or select and right-click the Underlay icon. The Object Properties docker opens.
2If not already open, go to the Stitching tab and open the Underlay settings group.
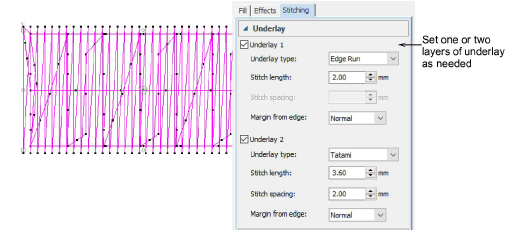
3If not already checked, tick the relevant Underlay checkbox and make a selection from the droplist. You have a choice two layers of underlay – Underlay 1 and Underlay 2. This allows you to apply dual underlays to design objects. A typical combination might be Edge Run with Tatami or Zigzag for larger objects. As a rule of thumb...
|
Underlay type |
Purpose |
|
|
|
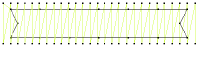
Use to stabilize narrow columns – e.g. 2-3mm wide. |
|
|
|
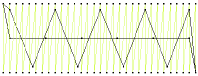
Use to stabilize somewhat larger shapes such as letters. |
|
|
|
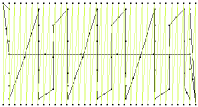
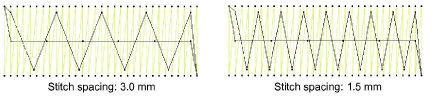
Use Zigzag underlay stitching to support wide columns. You can set stitch length properties for Zigzag underlay. The stitch length is the length of each zigzag stitch. |
|
|
|
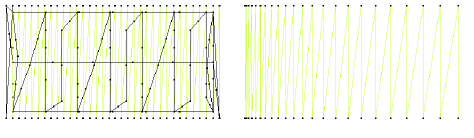
Tatami underlay is used to stabilize large, filled shapes. It resembles an extremely open tatami fill stitch, where rows of stitches are placed across the object to create the support. |
|
Tip: In addition to the predefined auto fabric settings, you can create custom fabric settings to suit particular needs. These can include preferred underlay settings.
Add-ons
Get started & learn faster with...