Use Edit Objects > Object Properties to show Object Properties docker. Use to preset properties for new embroidery objects or adjust properties for selected embroidery objects.
|
|
Use Edit Objects > Object Properties to show Object Properties docker. Use to preset properties for new embroidery objects or adjust properties for selected embroidery objects. |
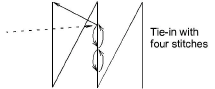 Tie-in stitches are inserted at the start of objects to prevent stitches from unraveling. They are inserted inside the shape on the second stitch. You generally use them when the previous connector is trimmed.
With trims, stitches need to be tied off so the thread can be trimmed without unraveling. Select between automatic tie-off methods to set preferred default.
1Click the Object Properties icon and select the Stitching > Connectors tab.
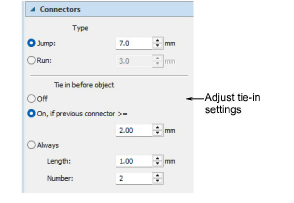
2In the Tie in before object panel, select a tie-in option:
|
Option |
Function |
|
Off |
No tie-ins are inserted. By selecting this option, you need to add tie-in functions manually. |
|
On if next connector >= |
Tie-ins are inserted when the previous connector exceeds the length specified – e.g. 2mm. |
|
Always tie in |
Tie-ins are always inserted before the object. |
3Set tie-in values:
|
Option |
Function |
|
Length |
Determines the stitch length for tie-in stitching. |
|
Number |
Determines the number of tie-in stitches to generate. |
1Click the Object Properties icon and select the Stitching > Connectors tab.
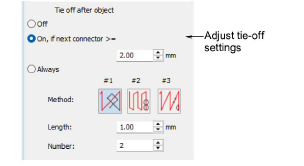
2In the Tie off after object panel, select a tie-off option:
|
Option |
Function |
|
Off |
No tie-off is inserted. By selecting this option, you need to add tie-off functions manually. |
|
On if next connector >= |
A tie-off is inserted if the next connector exceeds the specified length. |
|
Always tie off |
A tie-off is inserted after the object. |
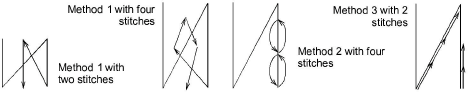
3If ‘Always’ is selected, select a default tie-off method. The system will apply this method where it can but switch where necessary, depending on stitch spacing and type.
|
Method |
Function |
|
|
1 |
|
Adds a specified number of small stitches between the last two stitching lines. Generally used with dense fills. |
|
2 |
|
Adds a specified number of small stitches up and back down the last stitching line. Generally used with open fills where it is less visible. |
|
3 |
|
Splits the second-last stitching line into three equal stitches. Also adds a specified number of small stitches back up the last stitching line. |
4Set the tie-off values:
|
Option |
Function |
|
Length |
Determines the stitch length for tie-off stitching. |
|
Number |
Determines the number of tie-off stitches to generate. |
Method 2 is generally more visually pleasing on smaller objects and satin columns. With this method, however, stitches sew on top of each other with the consequent risk of thread breakage.
Method 3 is designed mainly for run stitch types, but usable for other stitch types. This tie-in/off allows you to achieve a clean, secure finish. You can control the stitch length and number of needle penetrations depending on the fabric and application it is being used for. It’s great for surface quilting, fine delicate fabrics, heirloom work, and vintage art works. It saves time in these applications as compared to the typical option of manually creating tie-in/offs.
On larger areas, the safer alternative is Method 1. Method 3 provides an alternative method for hiding tie-offs along existing stitch lines.
For narrow shapes or columns – e.g. small lettering – use only one tie-off stitch. You may also decrease the stitch length.
Add-ons
Get started & learn faster with...