Create Raised Satin
Typically, Raised Satin is used to create extra body in narrow satin objects for visual effect and to provide a raised or ‘sculpted’ surface. It is used to mimic the padded satin stitch which is manually done on machine. It can also be used with delicate handcraft- and heirloom-type designs. When done by hand, these all employ a narrow satin padded fill.
Use Raised Satin outline for narrow lines of even width.
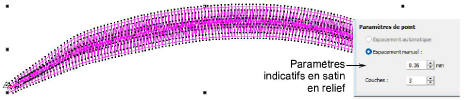
Raised Satin is best applied to objects 7mm wide or less. This is a safe average for most machines. Indicative settings for best ‘loft’ are 0.30mm manual for satin spacing with 3 or 4 layers. Or rely on Auto spacing for most object shapes.
Caution: The width of a raised satin object must be less than maximum width your machine can stitch. This will be different for some machines. If in doubt, refer to your machine documentation.