Click View > Show Hoop to show or hide hoop. Right-click for settings.

Use Customize Design / Output Design > Auto Start and End to set start and end points for the entire design.
|
|
Click View > Show Hoop to show or hide hoop. Right-click for settings. |
|
|
Use Customize Design / Output Design > Auto Start and End to set start and end points for the entire design. |
Before stitching, some embroidery machines require you to position the hoop precisely in relation to the needle. Some machines require stitching to start in the center of the hoop, some at the periphery. Some machines require the needle to finish at the center, others at the last stitch.
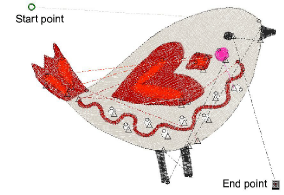
Turn on connectors via the Show Design droplist or press Shift+C. A green circle indicates the start point while a white square indicates the end point.

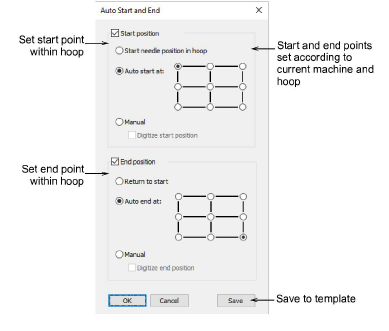
Use the Auto Start and End shortcut in the Customize Design toolbox to access the dialog. The Design Settings menu also provides a link. By default, design start and end points are set according to the currently selected machine and hoop. These correspond to cross hairs on the hoop.

Sometimes you want to set your own start and end points for a particular design or hoop. Click Start position and End position to activate options. In the example below, start and end points are set to top left and bottom right respectively.
Alternatively, digitize your own start and/or end points by choosing the Manual method. This is usually used to align embroidery with other components on the garment or article.
By ticking the checkbox, you will be prompted to mark the start/end point after closing the dialog.
By leaving it unticked, the software will use the previously-digitized position.
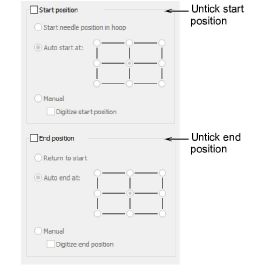
Alternatively, untick Start position and End position checkboxes to return settings to default values – the first and last stitch of the design become start and end points.

Click OK. Connecting stitches will be inserted as required before the first and after the last stitches of the design.
Use the Save button to save your preference to the template. This becomes the default setting for all new blank designs.
Check your machine for the required start and end needle positions. If not to set correctly in the software, your machine may not be able to read the design.
Some file formats will override auto start and end settings set in the software.
The Manual method is also convenient if you want to prevent the hoop moving around while digitizing, as occurs with Automatic Centering.
By setting manual start and end points, the hoop remains in a fixed position, similar to Brother PE-Design. This gives you the freedom to position objects anywhere within the hoop. It is especially useful for multi-position hoops as it can help to minimize re-hooping.
The Context > Center All command can be used to center the whole design and hoop at the (0,0) position. This means you can reposition the hoop around the design after you have finished digitizing without the need for auto-centering.