Output for multi-position rotating hoops
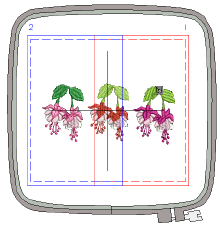 Hatch Embroidery supports multi-position rotating hoops. These are two- or three-position hoops which expand the available stitching area of the machine for which they are supplied. The stitching areas are shown in red and blue. The red area is normally stitched first. Then, after rotating the hoop, the blue area is stitched.
The physical embroidery area of multi-position hoops is represented by the solid line. However, any rotation of the hoop may cause a small positioning gap. To avoid this, a margin of 5mm is allowed on both sides. This is represented by the dashed line. We recommend you stay within the dashed area.
Caution: If objects in the blue area are sequenced before the red, you cannot save as a multi-position hoop design. That is, you cannot create a single EMB file which has its start in the second hoop position. This would require more than a single EMB file which is not allowed.
To output a design for a multi-position rotating hoop...
1Open the design to output to machine. The stitching areas are shown in red and blue.
2To export to a format recognized by your selected machine, click the Export Design icon. If you have not already split objects between hoop positions, Hatch Embroidery determines whether there are any that do not lie wholly within one of the hoop’s two (or more) positions:
-
If so, they are selected in the design window and you are prompted to edit, split, or delete them.
-
If the design can be stitched in the hoop, the Export Machine File dialog opens.
-
If the design will not stitch as a single hoop design – i.e. more than one hoop rotation would be required – a warning message is displayed.
3Select the design name and click the Save All Now button.
Depending on your machine format, Hatch Embroidery may save all split designs to a single file that your machine can read. Or it may save each one to its own file, with the sewing order indicated as a suffix to each file name.


