
Use Output Design / Standard > Print Design to print the current design.

Use Output Design / Standard > Print Preview to preview design worksheet. Print from preview window.
|
|
Use Output Design / Standard > Print Design to print the current design. |
|
|
Use Output Design / Standard > Print Preview to preview design worksheet. Print from preview window. |
Print options give you precise control over your design printout. Different worksheet configurations are available for different purposes – design worksheet, color sequence, appliqué pattern, as well as hooping sequence. Each configuration can be further customized.
1Click Print Preview or Print Design.
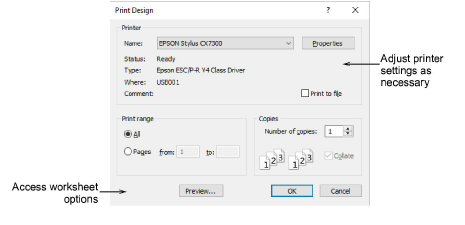
2Choose your preferred printer if not already set up. Many PDF programs are set up as a PDF printer. In this case, you may ‘print to PDF’ which actually saves the file to PDF format.
3In the dialog, click Options to further configure print options. The default worksheet type is the ‘design worksheet’.
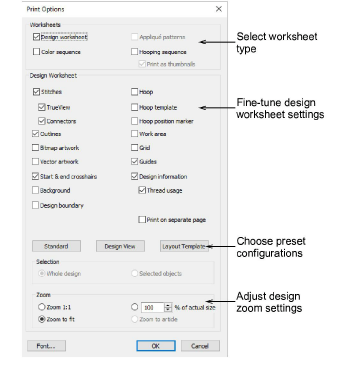
4Set a worksheet type.
|
Type |
Purpose |
|
Design worksheet |
This provides all production-related information, such as bobbin length, design size, garment fabric, etc, is provided. |
|
Appliqué patterns |
This shows appliqué patterns – cutter information – isolated from the design. These can be used as a guide to cutting out fabric pieces. |
|
Color sequence |
Provides a list of colors in the design, together with color and stitch information for each color layer. |
|
Hooping sequence |
If there is more than one hooping in the design, this option displays hoopings in their correct color sequence. |
5If you have selected ‘design worksheet’, three presets are available:
|
Preset |
Purpose |
|
Standard |
Resets worksheet options to default values. |
|
Design view |
Shows the design as it appears in the design window. |
|
Template mode |
Shows the design outlines with no stitches. |
6Further configure design worksheet options as preferred. See below for details.
7Optionally, print the whole design or selected objects only. If the latter, select the objects before accessing the Print Options dialog.
8Select a sizing option from the Zoom panel. When selecting Template Mode, the Actual Size option is automatically selected. If the Zoom 1:1 option is selected, both an assembled appliqué layout and individual patterns in the actual size are created on separate pages. If the Zoom to fit or % of Actual options are selected, the assembled appliqué layout is created in the selected size, but individual patterns are still printed in the actual size on separate pages.
Note: While the cloth setting marking is supported in JEF and SEW files, outlines are not. Since JEF and SEW are machine file formats, they only contain stitch data, no outlines. The workaround is to display JEF and SEW files with stitches and cloth setter marking turned on.
Add-ons
Get started & learn faster with...


