
Use Manage Designs > Print Selected to print the design selected in the Design Library window.
|
|
Use Manage Designs > Print Selected to print the design selected in the Design Library window. |
The Print Selected command allows you to print worksheets directly from Design Library.
Go to the Design Library (Manage Designs) and select a design to print.
Click the Print Selected icon. The Print Design dialog opens.
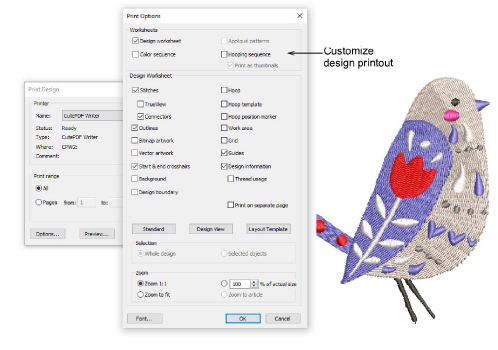
To customize the printout, click the Options button.
|
Report |
Purpose |
|
This provides complete sewing information for the design. All related information, such as bobbin length, design size, garment fabric, etc, is provided. |
|
|
This shows appliqué patterns – cutter information – isolated from the design. These can be used as a guide to cutting out fabric pieces. |
|
|
Provides a list of colors in the design, together with color and stitch information for each color layer. This helps the machine operator to see each stitch color in order of stitchout. |
|
|
If there is more than one hooping in the design, this option displays hoopings in their correct color sequence. |
Use the preset buttons to filter the design worksheet options – ‘Standard’, ‘Design View’, and ‘Template Mode’. The Design Worksheet panel provides options for further customization. See also Print designs.
Click OK and ensure correct printer settings in the MS Windows® Print Setup dialog.
The dialog and the settings available will vary from printer to printer. See your printer manual for details.
Add-ons
Get started & learn faster with...


