Assign threads for auto-digitizing
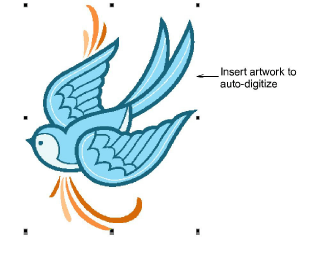
Artwork can be inserted, pasted or scanned into Hatch Embroidery for use as digitizing backdrops. For both manual and automatic digitizing purposes, ‘clean’ images, sometimes referred to as ‘cartoons’, work best. The auto-digitizing tools handle both bitmap and vector formats.
To assign threads for auto-digitizing...
1Scan, insert, or paste the artwork you want to use. See Import artwork for details.
2Whether you’re working with bitmap or vector graphics as input, you may want to prepare them first:
3Unless you have already done so, use the Context toolbar to size your artwork to its intended dimensions. See Edit artwork for details.
4Optionally, select Design > Auto Fabric to apply preferred fabric settings. See also Fabrics & densities.
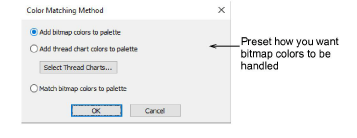
5Optionally, click Color Matching Method to determine how you want thread color matching to be handled.
You have three options:
-
Add bitmap colors directly to the design palette (default).
-
Choose a chart and match bitmap colors to actual threads. Click the Select Thread Charts button to access thread charts.
-
Or, match bitmap colors to the nearest colors in the design palette.
Tip: Various techniques are available for changing design colors from the Design Colors toolbar. See also Design colors.
Related topics