
Use Create Layouts / Context > Laydown Stitch to generate a light fill to flatten the nap of textured fabrics like terry toweling and fur for subsequent embroidery.
|
|
Use Create Layouts / Context > Laydown Stitch to generate a light fill to flatten the nap of textured fabrics like terry toweling and fur for subsequent embroidery. |
The Laydown Stitch feature automatically generates a light fill to flatten the nap of textured fabrics like terry toweling and fur so that embroidery is not lost.
1If you intend to create a laydown fill for an entire design, simply click the Laydown Stitch icon. Alternatively, select a specific object or objects first.
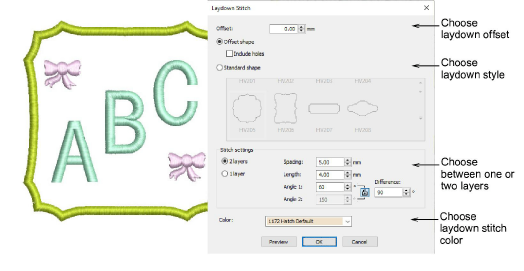
2Choose a laydown offset – e.g. 2mm. This allows a margin between selected object/s and layout boundary.
3Choose a laydown style:
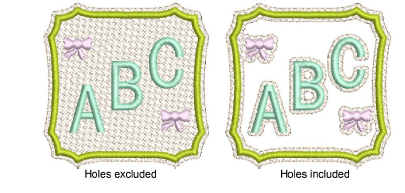
If Offset shape is selected, a laydown fill will be generated conforming to the boundary of the design or selected object/s. Optionally, include holes if you want the nap to show through the non-embroidered sections.
If Standard shape is selected, choose one from the border gallery.
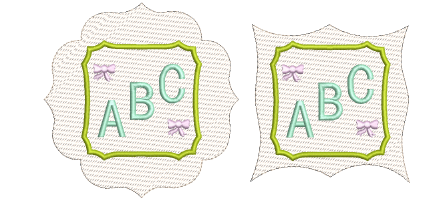
Note: When using Standard Shapes, some irregular shapes may cause a larger offset than expected. Once created, you can select and resize the shape to the desired size.
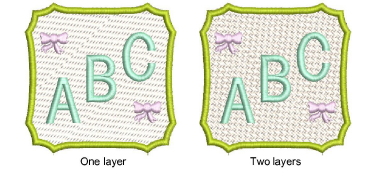
4Choose the number of layers you want to include in the laydown fill. This will depend on the density of the fabric nap.
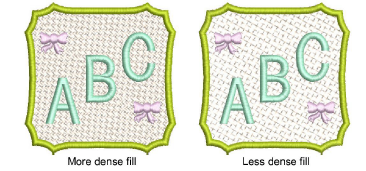
5Adjust the spacing and length settings for a more or a less dense fill. This again will depend on nap density.
Note: If 2 layers is selected, the second layer will take the same stitch settings as the first but the stitch angle will be determined by Angle 2.
6Optionally, adjust opposing angle settings if using two layers of stitching. The default is 90° (perpendicular).
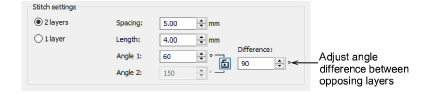
Tip: Laydown stitch angles can be adjusted at any time via the Object Properties > Fill tab. The Stitch Angle setting under the Stitching tab has no effect on laydown stitching.
7Choose a laydown stitch thread from the Color droplist. Generally, you will want your laydown fill to blend with the intended fabric. Alternatively, if you choose a standard border shape for instance, you may want to highlight the shape in a contrasting color.
8Optionally, click Preview to generate the fill without closing. Move the dialog as necessary. Persist until you are happy with the result.
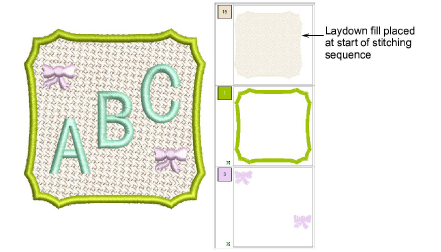
9Click OK to confirm and regenerate. The resultant laydown object is placed at the start of the stitching sequence.
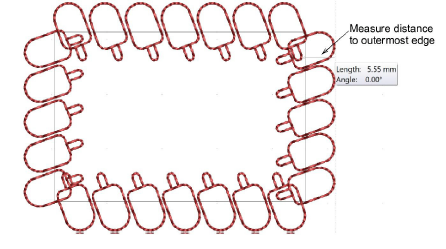
Laydown Stitch ignores motif shapes when generating stitching for motif outlines or borders of monogramming objects. Instead, stitching is generated based on the object outline. You may need to manually resize to obtain the result you want.
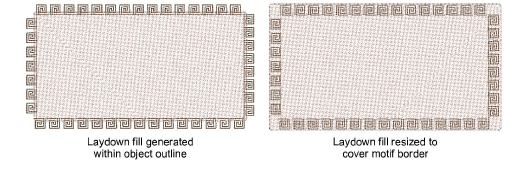
Assess where the motif sits on the digitized line and measure the distance to the outermost edge of the motif. Use this value to adjust the laydown stitch offset to ensure it covers the motif outline.
Laydown Stitch can also be applied to keyboard design collections. However, it may not always give you the desired effect, particularly if letters contain a lot of open spaces. Sometimes you can increase Laydown Stitch offset to obtain the desired effect.
Add-ons
Get started & learn faster with...


