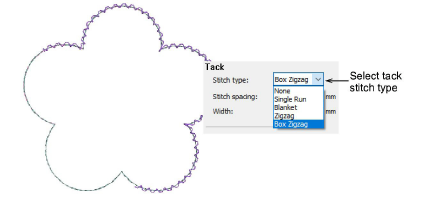
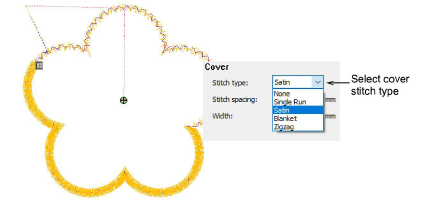
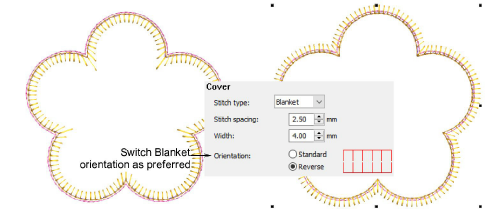
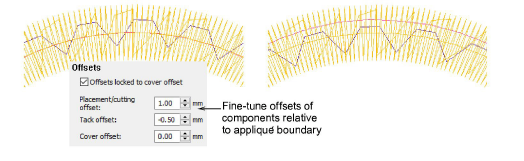
The cover stitch is the border around an appliqué shape. You can control various cover settings including stitch type – Satin, Blanket, Zigzag, etc. Tack stitch, as the name suggests, secures the appliqué piece after it has been placed in position. Different usage scenarios require different settings. Carefully adjust them to achieve the desired outcome.
Select a tack stitch type as required – e.g. Run, Blanket, Zigzag, etc. Choose ‘None’ to exclude altogether. If used, the choice of tack stitch will be determined by roughness of fabric edge and possibly weight. You have control over tack stitch width and spacing. Width is constrained by width of cover stitch, if used.
Select a cover stitch as required – e.g. Satin, Zigzag, etc. Choose ‘None’ to exclude altogether. You have control over cover stitch width and spacing.
If you choose Blanket as cover stitch, an additional Orientation setting is available. This allows you to switch stitching orientation as shown...
Use Offsets to offset cover stitch relative to appliqué boundary – inside or outside. Tick the checkbox to lock placement line and tack offset to the cover stitch.
Tack and placement line offset controls are also available when the checkbox is selected. Placement line and tack offset can be independently set.
Flipping Blanket stitch orientation does not affect the offset relative to the digitized curve.
Offset ranges are constrained to ±10 mm.
There is only one cover offset value rather than separate offsets for each cover type.
The Partial Appliqué tool is disabled if a selection contains appliqué with a cover offset beyond ±½ the cover stitch width.
When saving to an earlier format, appliqué objects with a cover offset beyond the range ±½ width are first broken apart.